Difference between revisions of "Setting up AltServer on VMware ESXi"
m |
|||
| (4 intermediate revisions by the same user not shown) | |||
| Line 43: | Line 43: | ||
During installation you'll configure a user (root) and a password, which you'll need to log-on to the page. | During installation you'll configure a user (root) and a password, which you'll need to log-on to the page. | ||
Open the IP address shown on your server monitor on a modern browser like Firefox. Don't forget to add HTTPS. The address might look something like "<nowiki>https://192.168.0. | Open the IP address shown on your server monitor on a modern browser like Firefox. Don't forget to add HTTPS. The address might look something like "<nowiki>https://192.168.0.49</nowiki>" | ||
You're now ready to create a virtual machine. | You're now ready to create a virtual machine. | ||
| Line 138: | Line 138: | ||
This step is a bit fiddly, but don't skip it otherwise you'll run into issues. | This step is a bit fiddly, but don't skip it otherwise you'll run into issues. | ||
Open the Windows search and open "Windows Defender Firewall with Advanced Security". | Open the Windows search, then search and open "Windows Defender Firewall with Advanced Security". | ||
You'll see a window like this: | You'll see a window like this: | ||
[[File:Windows_Firewall_settings.png|alt= | |||
[[File:Windows_Firewall_settings.png|alt=|715x715px]] | |||
Take a note on the left is a menu entry named "Inbound Rules", click on it to load the rules, then right click it and select "New Rule". | Take a note on the left is a menu entry named "Inbound Rules", click on it to load the rules, then right click it and select "New Rule". | ||
| Line 192: | Line 193: | ||
====Configure AltCheck==== | ====Configure AltCheck==== | ||
AltCheck is a | AltCheck is a script written to monitor the "Apple Mobile Device Service" which is responsible for device connections. | ||
It also monitors AltServer.exe and restarts it in the background when it crashes. | |||
You can find a README on how to get this running here: https://github.com/DiscordDigital/AltCheck-Reborn | |||
====Conclusion of this setup==== | ====Conclusion of this setup==== | ||
| Line 279: | Line 209: | ||
If you need to reconnect your iPhone to your virtual machine, you can do, but you most likely have to edit the virtual machine and re-select the iPhone. | If you need to reconnect your iPhone to your virtual machine, you can do, but you most likely have to edit the virtual machine and re-select the iPhone. | ||
[[Category:AltServer]] | [[Category:AltServer]] | ||
[[Category:AltStore]] | [[Category:AltStore]] | ||
[[Category:Virtualization]] | [[Category:Virtualization]] | ||
Latest revision as of 12:17, 7 February 2024
Prologue
This guide will help you install AltServer on a Windows virtual machine using VMware ESXi free edition.
At the end of this guide you'll be able to run AltServer without any user session in the background of your virtual machine.
We cover everything in this guide from port exceptions, antivirus software to Windows process handling of AltServer.
You can only do this setup if you plan to run a server 24/7, which can be any computer that is capable of virtualization on your network.
VMware ESXi will be able to run multiple other VMs and this guide will integrate into your home network.
You'll need following:
- a free VMware account which you can get here
- a physical computer that is capable of virtualization
- an iPhone cable to do the initial bonding to iTunes
- (optional) a Windows 10 key to activate your machine
- basic network understanding of IPv4, static IP addresses and what a DHCP server is
Getting VMware ESXi free
After you signed up to VMware it will actually take a day for your free ESXi key to be made, but no need to wait,
ESXi can be downloaded anytime and will run in trial mode.
You can always check on your account if any product keys have been added, and add it later on.
The page you're looking for is https://my.vmware.com/en/web/vmware/evalcenter?p=free-esxi7
You can now start by adding a physical drive (SSD recommended) to your virtualization host.
When you've done building your server, make sure to configure the BIOS for it to always start in the power options.
Flash the latest ESXi ISO file to a USB stick using a tool like Rufus.
Once the installation stick is ready, connect your server to your network, then insert the USB stick into your physical server and install ESXi like any Linux distribution.
When you're done you'll be prompted with an IP address on your server monitor.
At this point you can login through the monitor and change the IP address to a static one, make sure it is not inside the DHCP pool,
if it has to be inside the DHCP pool, make sure the DHCP server has a feature to detect static IP addresses to prevent multiple of the same IP addresses.
During installation you'll configure a user (root) and a password, which you'll need to log-on to the page.
Open the IP address shown on your server monitor on a modern browser like Firefox. Don't forget to add HTTPS. The address might look something like "https://192.168.0.49"
You're now ready to create a virtual machine.
Installing your AltServer VM
Deciding on a name scheme
Pick an appropriate name for your virtual machine, if you don't have a name scheme you can try something like:
| S | AS | 01 |
|---|---|---|
| Server | Type : AltServer | Count |
This scheme will result in a machine name such as SAS01,
if you were to install a personal VM you might name it SVM01.
The naming scheme is pretty much irrelevant for the technical part, however it'll help you organize your virtual machines.
So make sure you pick a scheme that helps you design your virtual machines.
Figure out a static IP address for your virtual machine
Next you want to figure out an IP address configuration, so you can assign a static IP address to your AltServer VM.
This step will help you later on lower the complexity and increase the chance of succeeding a request from AltStore.
Take note of your configuration.
Create the virtual machine
Start by creating a new virtual machine on the web-interface of your VMware ESXi server, and fill out everything appropriately to your design.
Your machine should be named as previously mentioned by your scheme. You'll want to add at least 4 GB of ram and 100 GB of virtual disk storage.
On a long term run it has been proven to us that 100 GB is very appropriate for any Windows system including software, updates and Windows log files.
Once created you'll quickly realize you need an installation medium.
Grab one from the Microsoft page or use one that you already might have.
Then upload it to your ESXi server, preferably in a folder named "Install", but the name of the folder is up to you.
Edit your virtual machine and add the ISO file from your Datastore (storage on ESXi server), make sure it says "Connect at power on" and also "Connect" on the side of the option.
If you don't see a CD drive to mount an ISO file to, you can also add one by clicking "Add other device".
Finally start up the virtual machine and configure through it.
When you finally reached the desktop make sure to install VMware guest additions, so the virtual machine gets the full performance from your server.
Configure your virtual machine
Important things to configure
Add your optional Windows key as required, rename the virtual machine in the system properties to the name you gave your AltServer VM, and configure the static IP you decided on earlier.
If you don't add your Windows key, the virtual machine will just run fine. However personalization options will be disabled. (Wallpaper, color of task bar)
Don't forget to give your user a password. This will also improve the safety on a Windows machine that is running continuously.
About antivirus products
In case you want to run an antivirus software on it, make sure you also configure the antivirus to make exceptions for AltServer.
Some antivirus products come with built-in firewalls. So it might be necessary to configure port exceptions as well.
If you're not sure if your antivirus is causing problems. Uninstall your antivirus and see if the problems persists.
Conclusion of this chapter
You now have a virtual machine ready to be configured to run AltServer.
Follow the next chapter to setup iTunes, iCloud, AltServer, AltCheck and task scheduler to create a seamless AltServer VM experience.
Setting up AltServer to run on a virtual machine
Download and install Apple software
First you want to download all important software pieces from Apple.
You'll have to avoid store versions, as they don't come with the proper components AltServer need.
Download iTunes here: https://www.apple.com/itunes/download/win64/
Download iCloud here: https://support.apple.com/en-us/HT204283 (Click on "download iCloud for Windows on Apple's website" where it says "* On Windows 7 and Windows 8...")
Install both on your virtual machine.
Download and install AltServer
Download AltServer from here: https://altstore.io/
Then install it normally, if you get prompted, install it for all users.
Configuring Windows Firewall
This step is a bit fiddly, but don't skip it otherwise you'll run into issues.
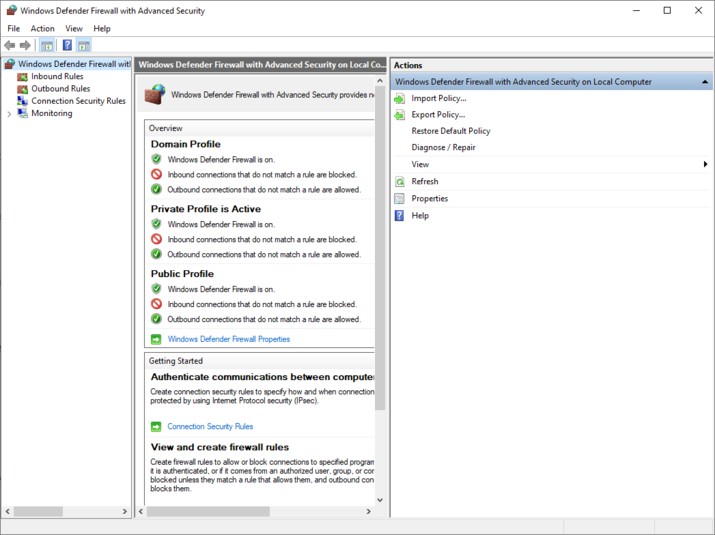
Open the Windows search, then search and open "Windows Defender Firewall with Advanced Security".
You'll see a window like this:
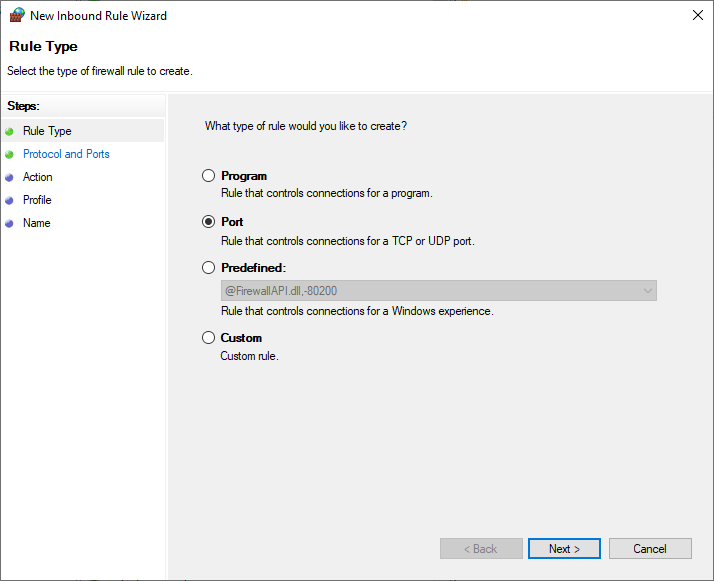
Take a note on the left is a menu entry named "Inbound Rules", click on it to load the rules, then right click it and select "New Rule".
A new window will open which will look like this, switch the option to "Port", then click on Next.
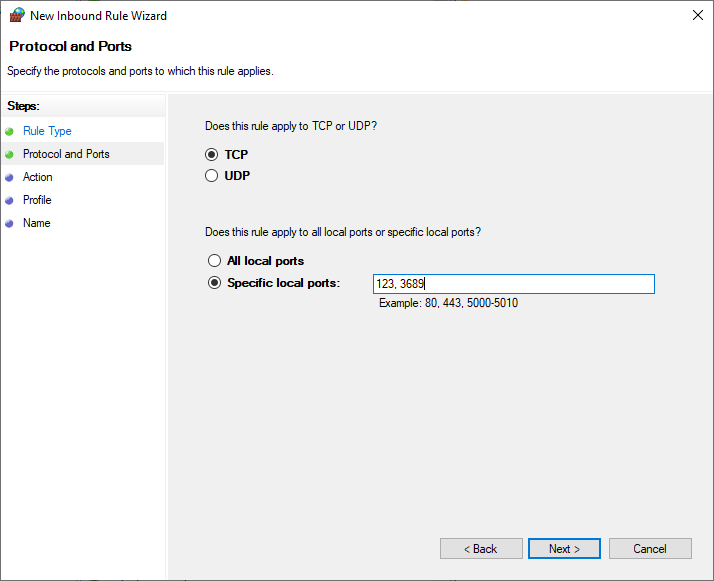
Configure next window to look like this:
Hit Next and leave the configuration as it is until you get to "Name", then name it "AltServer TCP".
Now, right click "Inbound Rules" again, and then "New Rule".
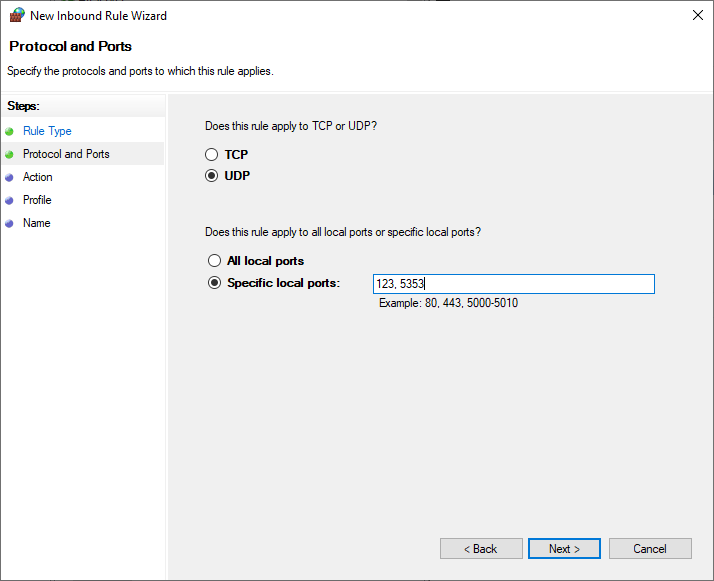
You'll do the very same but for "Protocol and Ports" you will select "UDP" and specify different ports.
Configure it to look like this:
Configure through it until you get to "Name" and name it "AltServer UDP".
Finish the configuration and you're done configuring the Windows Firewall!
You can now close the Firewall related windows and move on to the next step.
Connect your iPhone to the VM
This step is pretty simple, grab the lightning to USB cable and plug it into your physical server.
Then while your virtual machine is running, edit it and hit "Add other device", then add a "USB controller".
Now click "Add other device" again, and hit "USB device", look for the USB device in the VM options and change it so the Apple iPhone is connected.
Save your VM settings and your iPhone should show up inside of iTunes on your AltServer VM.
Click on your phone and enable "Sync with this iPhone over Wi-Fi".
Great! You can now disconnect your iPhone from your server and also remove the cable.
Configure AltServer
At this point you should see AltServer on the bottom right, make sure to click it and uncheck "Automatically Launch at Startup".
This is because we don't want AltServer to run twice. If you skip the task scheduler step, then you can leave it enabled or enable it.
Now click AltServer and install AltStore on your iPhone, this will create the link between the phone and the server.
When done you can move on to the next step.
Configure AltCheck
AltCheck is a script written to monitor the "Apple Mobile Device Service" which is responsible for device connections.
It also monitors AltServer.exe and restarts it in the background when it crashes.
You can find a README on how to get this running here: https://github.com/DiscordDigital/AltCheck-Reborn
Conclusion of this setup
If we've done everything correctly we should now have AltServer running in the background of Windows.
AltStore can communicate to it over Wi-Fi and it should work more reliable than usually.
There's still a chance that something might hang up, if reproducible, please leave an issue on GitHub.
For general issues with AltServer (independent from this guide), please consult the AltStore Discord server. You can obtain the access through Patreon.
If you need to reconnect your iPhone to your virtual machine, you can do, but you most likely have to edit the virtual machine and re-select the iPhone.


